Pic Editor
A great photo can be taken in a second, but a great result often happens in the next minute—when you adjust the framing, clean up distractions, refine light, and make the picture feel exactly like what you meant. That’s where a Pic Editor becomes part of the creative process, not just an “extra step.” A good edit doesn’t hide reality. It clarifies it. It helps your picture communicate faster, cleaner, and with more confidence.
Picicon’s Pic Editor page is for anyone who wants to edit images without the heavy learning curve, without complicated software, and without turning simple tasks into a project. Sometimes you want a quick pic editor online to fix something before you post. Sometimes you want a thoughtful pic editor workflow for a profile photo, a product image, a document photo, or a thumbnail. Sometimes you simply want a pic editor free experience that feels safe, respectful of privacy, and easy to use.
This guide is written like a practical companion: what to edit, why it matters, and how to get better results with less effort—especially for the most common tasks people search for: pic background remover, pic resize, resize pic, how to resize pic, pic quality enhancer, pic enhancer, pic quality reducer, and pic crop for sizes like 1x1 pic and 2x2 pic.
The mindset of a modern pic editor
Editing is not about doing more. It’s about doing the right few things. The best edits usually come from small changes that add up: a cleaner crop, slightly better brightness, a background that stops fighting the subject, and a size that fits the platform without losing clarity.
A modern pic editor online should support that mindset. It should let you move quickly when you want speed, and it should also offer enough control when you want precision. It should feel friendly on desktop and on mobile. And it should keep you focused on the result instead of making you fight menus.
When you edit with intention, you start asking simple, powerful questions:
What is the main subject of this picture?
What is distracting from it?
Where is the light coming from, and does it feel natural?
What will this picture be used for—social, print, ID, website, product, message?
Once you answer those questions, editing becomes obvious. You don’t need endless filters. You need clarity.
Why people love a pic editor online
The reason people search for a pic editor online is not just convenience. It’s momentum. Online editing keeps you in the flow. You take a picture, you refine it, you export it, and you move on. That matters when you’re working, building a brand, selling something, sending an application, or simply sharing moments.
A web-based editor also solves common friction points:
You don’t need to install anything.
You can edit from any device.
You can work in short sessions.
You can fix one thing fast: background, size, crop, quality.
Of course, “online” also raises a valid concern: privacy. People want speed, but they don’t want to feel exposed. A trustworthy pic editor should be transparent about what it does with your uploads, minimize data retention, and keep the user in control. Editing should feel safe.
What “easy” really means in a pic editor
Easy doesn’t mean “limited.” Easy means you can do the core tasks without confusion. You shouldn’t need an advanced design degree to remove a background, change a size, crop to a specific ratio, or make an image look sharper.
In practice, ease comes from a few principles:
The interface uses plain language.
The main tools are obvious.
You can undo changes without fear.
Exporting is simple.
You can see your changes clearly before saving.
That’s what people actually mean when they say “I need a pic editor.” They want an editor that respects their time.
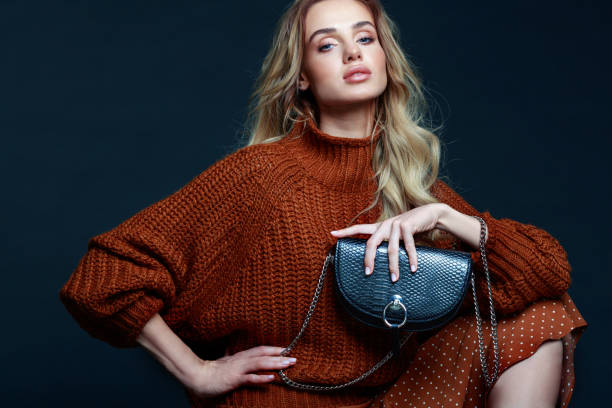
Pic background: the invisible power of a clean backdrop
A background is not “nothing.” Background is mood, context, and sometimes noise. A busy background can ruin an otherwise good picture because it steals attention, adds visual mess, and makes the subject look less important.
When people search for pic background, they often have one of these goals:
They want a clean background for a profile photo.
They want a product image on a white background for a store.
They want to remove clutter from a family photo.
They want to isolate a subject for a thumbnail, poster, or collage.
They want a consistent style across many images.
A strong background helps your subject feel intentional. The image reads faster. Your eyes land where they should.
Pic background remover: what it is and when it works best
A pic background remover separates the subject from the background. In simple terms, it “cuts out” the person, object, or animal, and lets you replace the background or keep it transparent.
Background removal works best when:
The subject has clear edges against the background.
Lighting is decent and not too dark.
The subject is in focus.
There isn’t extreme motion blur.
Hair and fine details can still work, but they’re more challenging. If you want the cleanest results, you can help any pic background remover by choosing the right source photo. Stand a little away from the wall. Avoid backgrounds with the same color as your hair or clothing. Try to keep the subject well-lit.
Background removal is useful beyond aesthetics. It’s practical. It can turn a quick photo into a usable asset.
Choosing the right background after removal
Once the background is removed, you have choices. You can place the subject on a solid color, a gradient, a blurred environment, or an entirely different scene. The key is to match the new background to the purpose of the image.
For professional use, simple backgrounds usually win. A soft neutral color can feel clean and modern. A white background is common for e‑commerce. A subtle blur can feel natural if you want the subject to stay realistic.
For creative use, your background can tell a story. But even then, the background should support the subject, not compete with it. If the background has strong patterns, reduce contrast or blur slightly so the subject stays in control.
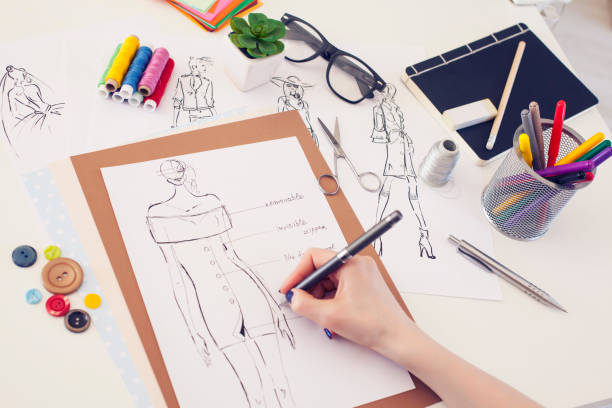
Pic crop: the fastest way to improve any picture
If there is one editing action that improves almost everything, it’s cropping. A pic crop is not just cutting edges. It’s choosing what matters. Cropping removes distractions, tightens the composition, and changes the emotional distance between viewer and subject.
Cropping is also the first step for platform fit. Social platforms, profile photos, and ID photos often demand specific ratios.
A good crop typically does three things:
It centers attention on the subject.
It removes irrelevant space.
It improves balance and symmetry.
If you’re not sure where to start, crop in slightly. Then ask: does the picture feel clearer? If yes, you’re moving in the right direction.
1x1 pic: the square that still dominates the internet
The 1x1 pic is everywhere: profile photos, avatars, grids, thumbnails, and many social layouts. The challenge with a square crop is that it leaves less room for context. You must choose what to include carefully.
For a 1x1 pic of a face, a common mistake is cropping too tight on the forehead or chin. A square needs breathing room while still being close enough to read expression. If you include shoulders, keep them balanced. If you include background, keep it simple.
For a 1x1 pic of an object or product, aim for symmetry and clean edges. A square crop can make products look premium when the composition feels centered and intentional.
2x2 pic: why it’s popular for documents and IDs
People often search for 2x2 pic because of documents, applications, and ID requirements. Even if the final print size is 2x2, the concept is essentially a square format with stricter expectations: clean background, clear face, correct framing, and good quality.
For a 2x2 pic used in official contexts, focus on clarity:
Use even lighting so the face is not half-shadow.
Use a neutral background if possible.
Avoid extreme angles or heavy filters.
Keep the face centered, with a natural expression.
A good pic editor makes it easy to crop precisely without guessing.
Pic resize: why size is not just “pixels”
When people search for pic resize, they’re often dealing with a limitation: a website that demands a maximum file size, a platform that needs a specific dimension, an email attachment limit, or a page that loads too slowly.
Resizing is not only about changing width and height. It’s about making the image fit a purpose while preserving the feeling of quality.
There are two common resizing goals:
Change dimensions (for example, make an image 1080px wide instead of 4000px wide).
Reduce file weight (for example, reduce from 6MB to 400KB).
Sometimes you need both. That’s why an editor that supports pic resize and smart exporting is so valuable.
Resize pic without losing the “sharp” look
A frequent fear is that resizing will ruin the image. It can, but it doesn’t have to.
To resize pic well, keep these ideas in mind:
Downscaling usually looks fine. When you shrink a large image, it often looks sharper because details compress.
Upscaling is harder. Making a small image bigger can create softness or artifacts.
The export format matters. JPEG is common for photos, but too much compression can create blocky areas. PNG preserves detail but can be heavier.
If you’re resizing for social media, you often don’t need a massive file. Platforms compress anyway. A smart resize gives you control over how that compression looks.
How to resize pic for the real world
When someone searches how to resize pic, they usually want a clear, practical answer. So here’s the real-world way to think about it: start from the destination.
If the image is for a website, you want a balance between sharpness and speed. A wide hero image might need a larger width than a small thumbnail, but both should be optimized.
If the image is for a profile photo, you want clarity in the face at small size. Overly large files don’t add value.
If the image is for printing, you care about resolution at the print size and you want minimal compression.
If the image is for a document upload, you care about exact dimensions and file size limits.
A good pic editor online makes this feel simple because it lets you adjust size with a preview, then export cleanly.
Pic quality enhancer: what “enhance” should actually do
Enhancement is often misunderstood. A pic quality enhancer should not turn your photo into something fake. It should improve readability: sharper edges, better contrast, less noise, clearer details, and more balanced tones.
The best enhancement is subtle. It keeps skin natural. It keeps textures real. It doesn’t add strange halos around objects.
When you enhance a picture, you’re usually solving a specific problem:
The photo looks slightly blurry.
The subject is hard to see.
The lighting is flat.
The image is low resolution from an old upload.
The image was compressed too much.
A reliable enhancer helps you rescue a photo without turning it into plastic.
Pic enhancer: small improvements that feel big
Sometimes you don’t need a heavy “quality enhancer.” You just need a pic enhancer that fixes the basics: brightness, contrast, clarity, and maybe a touch of sharpening.
Think of enhancement like cleaning glass. You’re not changing the scene. You’re removing the fog.
A practical way to enhance without overdoing it:
First, adjust exposure so the subject is readable.
Then, add a bit of contrast so the photo has depth.
Then, add gentle clarity so details stand out.
Finally, check skin and smooth areas. If the picture starts looking harsh, pull back slightly.
The best pic enhancer is the one that keeps the picture believable.
When enhancement can hurt your image
It’s easy to go too far. Over-enhancement can create:
Unnatural skin texture.
Heavy outlines around objects.
Noise that becomes more visible.
Colors that look fake.
A picture that feels “processed.”
If you’re editing for professional use—like a profile photo or a product shot—subtlety is your friend. Let the picture breathe. Let it look human.
Pic quality reducer: why you sometimes want lower quality
It sounds strange, but many people need a pic quality reducer for practical reasons. Websites and forms often have strict upload limits. Email clients compress attachments. Messaging apps may fail to send large files. And if you’re managing many images, storage matters.
Reducing quality is not about making a picture ugly. It’s about reducing the file weight while keeping the image “good enough” for the purpose.
A smart reducer gives you control over the tradeoff between size and clarity. It allows you to aim for a target that fits your needs.
The difference between reducing quality and resizing
People often mix these up. Resizing changes dimensions. Quality reduction changes compression.
You can reduce file size by:
Resizing the image to fewer pixels.
Increasing compression (especially for JPEG).
Changing format (for example, using modern formats where supported).
The best approach depends on your goal. If the image is far larger than it needs to be, resize first. If it’s already the right dimensions but still heavy, reduce quality slightly.
A good pic editor helps you do both in a controlled way.
Editing for different use cases
The best way to understand image editing is to connect it to real goals. Here are common use cases and what to prioritize.
For a profile photo, prioritize a clean crop, natural enhancement, and a simple background. That’s where pic crop, 1x1 pic, and pic background remover become essential.
For a product photo, prioritize background consistency, accurate color, and sharp edges. Pic background decisions are crucial, and a slight pic enhancer can help textures look premium.
For social media posts, prioritize speed and fit. Pic resize and “ready-to-post” cropping save time. Enhancement should be gentle because platforms will compress.
For documents and applications, prioritize exact framing and clarity. 2x2 pic crops and controlled file size with a pic quality reducer can prevent upload issues.
For creative thumbnails, prioritize contrast and readability at small size. A clean cutout from a pic background remover plus a strong crop often works better than heavy filters.
Pic editor free: what “free” should still include
When someone searches pic editor free, they usually want to solve a task without paying, but they still want quality. Free should not mean frustrating.
A free editor should still provide:
Clean resizing and exporting.
Cropping with common ratios.
A usable background remover for typical images.
Basic enhancement controls.
A simple workflow that doesn’t trick the user.
Even when tools are free, your time is not. A good free experience is one that respects the user’s time.
The most common mistakes people make in a pic editor
Most editing mistakes come from rushing, not from lack of talent. Here are the common patterns:
Over-cropping: cutting too tight so the subject feels cramped.
Over-sharpening: creating halos around edges.
Over-smoothing: making skin look like plastic.
Over-saturation: colors become loud and unrealistic.
Ignoring the background: clutter stays and ruins the image.
Exporting too heavy: images load slowly on websites.
Exporting too compressed: details turn blocky.
The solution is simple: do less, but do it intentionally. Make one change at a time and check the result.
A simple editing flow that works for almost any picture
Even without turning this into a template, there is a natural order that makes editing easier:
Start with pic crop. Decide what matters.
Then adjust background if needed. If the background distracts, consider pic background remover or a cleaner pic background choice.
Then fix size. Use pic resize to fit the destination.
Then enhance carefully. Use pic quality enhancer or a lighter pic enhancer approach based on what the image needs.
Finally, export with the right file weight. If needed, use a pic quality reducer so the file fits limits without falling apart.
This flow is fast because each step supports the next. Cropping helps enhancement. Background cleanup helps clarity. Correct sizing prevents unnecessary compression.
How to make your edits look consistent
Consistency is what makes a set of pictures look professional. Even if you’re editing casual photos, consistency helps your visuals feel “you.”
To build consistency:
Use similar crops for similar purposes.
Keep background choices aligned. If you use clean backgrounds, keep them in a similar style.
Avoid extreme filters that change skin tone or lighting reality.
Aim for a similar brightness level across images.
If you use a pic editor online often, you can develop a natural taste: you’ll start recognizing what “too much” looks like. That’s a creative skill.
Editing for speed without sacrificing quality
Sometimes you need results in minutes. That’s okay. The key is to choose the edits that give the biggest improvement.
If you’re in a rush, do these first:
Crop distractions.
Fix size with resize pic so it fits where it needs to go.
Lightly enhance brightness and contrast.
If the background is truly messy, use pic background remover for a clean cut, but avoid spending too long perfecting tiny edges unless the image is for professional use.
Speed editing works when you focus on the few changes that matter most.
The truth about “HD” and “quality”
A common misunderstanding: “HD” is not the same as “quality.” A huge image can still look bad if it’s blurry, poorly lit, or overly compressed. A smaller image can look amazing if it’s sharp, well-exposed, and edited with care.
That’s why a pic quality enhancer can help, but it’s not magic. The most powerful quality upgrade is still a good source image: clear focus and decent light.
If you want better results, improve the input slightly. Step into better light. Hold the camera steady. Clean the lens. Those habits plus a good editor are a strong combo.
Pic background remover for people, products, and pets
Background removal is used for many different subjects, and each one has its own challenges.
For people, hair is the tricky part. Soft edges matter. A good cutout keeps hair natural and avoids “jagged” lines.
For products, edges are usually cleaner, but reflections and transparent items can be difficult. The goal is a crisp silhouette that looks real.
For pets, fur is similar to hair. Patience helps. A good source photo with strong contrast makes everything easier.
In all cases, the best approach is to avoid backgrounds that match the subject color. Separation is key.
Pic crop for storytelling
Cropping is not only technical. It’s storytelling. A wide crop can show context and place. A tight crop can show emotion and intimacy. A square crop can feel modern and direct.
For a romantic image, a slightly tighter crop on hands or faces can feel intimate. For a nature image, a wider crop can breathe and feel calm. For a funny moment, cropping can emphasize the expression that makes the moment work.
The crop is the editor’s voice. It’s how you say, “This is what matters.”
Resize pic for social platforms without stress
Every platform has its own habits, and people often get stuck worrying about exact numbers. You can simplify it by focusing on a few truths:
Most platforms prefer clear images that fit their common shapes.
Square and vertical formats often work well for feeds.
Quality drops when you upload giant files that platforms compress aggressively.
The safest approach is to keep images clear and not excessively heavy. Use pic resize to control the width and keep the file manageable. This prevents the platform from doing harsh compression.
If you want one guiding principle: export a size that matches how the image will be displayed. Bigger is not always better.
How to resize pic for websites and faster loading
Website speed matters. Images are often the largest files on a page. If your site feels slow, you may not need a redesign—you may need smarter image sizes.
When you use how to resize pic thinking for websites:
Make thumbnails small. Don’t use a full-size image as a tiny preview.
Make medium images medium. Many content images don’t need to be 4000px wide.
Compress sensibly. Keep detail in the areas that matter and reduce file weight in flat areas.
Consider consistent widths across pages. This makes your design feel stable.
A good online editor makes these decisions less intimidating, because you can see the result and adjust quickly.
Pic quality reducer for messaging and quick sharing
If you’re sending pictures via email or messaging apps, file size becomes real. A pic quality reducer helps you share without errors, delays, or failed uploads.
The goal is not “lowest quality.” The goal is “small enough to send easily, still looks good on a phone.”
That means you can often reduce quality more than you think, because phone screens are small and many apps compress images anyway. If you compress intentionally, you control the result.
Pic quality enhancer for old photos and screenshots
Not all images start as fresh camera photos. People often want to enhance:
Old family photos scanned from paper.
Low-resolution images from older devices.
Screenshots that need readability.
Cropped images that became soft.
A pic quality enhancer can help improve clarity, but again, subtlety wins. With old photos, the goal is often to restore memory: make faces readable, reduce noise, improve contrast gently. The photo should still feel like the time it came from.
With screenshots, the goal is usually text readability. Clarity and contrast are more important than artistic style.
The emotional side of editing
Editing is not only technical. It’s emotional. People edit pictures because pictures represent identity, relationships, and memories.
A profile photo is not just pixels; it’s how you show up to the world. A family photo is not just an image; it’s time you can’t repeat. A product photo can be income. A document photo can be opportunity.
That’s why a good pic editor experience matters. It reduces stress. It gives control. It makes you feel capable, even if you’re not “a photo person.”
Trust, transparency, and privacy in a pic editor online
Because this is a pic editor online, it’s normal to ask: what happens to my images?
A trustworthy tool culture includes clear communication about uploads, retention, and deletion. Users should feel safe editing personal photos, documents, and sensitive content. Even when you’re editing something casual, you deserve respect.
A good rule as a user: avoid uploading images you wouldn’t want stored if you don’t understand the privacy policy. And as a platform, the best approach is to minimize storage and be transparent.
Editing should feel like a private workspace, not like a public stage.
Your best results come from tiny habits
If you want better edits, the biggest improvements come from small habits before you even open the editor:
Clean your camera lens.
Shoot in soft light when possible.
Hold steady for sharpness.
Take one extra shot so you have options.
Keep backgrounds simple.
Then, when you edit, you’ll need less correction. Your pic background remover will work cleaner. Your pic quality enhancer won’t need to rescue heavy blur. Your pic crop will feel like a creative choice, not a fix.
When you don’t need editing
Sometimes the best choice is to do nothing. Not every photo needs enhancement. Not every picture needs resizing. Not every image needs a background removed.
If your picture already communicates clearly, keep it. Over-editing is common because people feel they “should” do something. But the strongest visual style is often restraint.
Editing is a tool. Use it when it helps the picture say what you want.
Putting it all together: the Pic Editor as a practical creative tool
When people think of photo editing, they sometimes imagine complicated software and endless options. But the reality is simpler. Most people need a few powerful tools, done well.
A good pic editor online helps you:
Crop with intention using pic crop and precise ratios like 1x1 pic and 2x2 pic.
Clean up distractions with pic background choices and a reliable pic background remover.
Fit images to real requirements with pic resize, resize pic, and practical answers to how to resize pic.
Improve clarity with a subtle pic enhancer or a stronger pic quality enhancer when needed.
Meet upload limits with a controlled pic quality reducer without destroying the image.
That’s the heart of modern editing: faster, cleaner, more confident pictures.
If you take one idea from this page, let it be this: editing is not about changing who you are or what you saw. Editing is about making sure the viewer sees what you meant. A better crop is a clearer message. A cleaner background is a calmer feeling. A correct size is less friction. A gentle enhancement is more presence.
Your pictures already have value. A thoughtful Pic Editor simply helps that value show up.